Python 自动化脚本完全指南:用代码解放双手,让效率翻倍的 8 个实战技巧 🚀

从文件批量处理到定时任务调度,从 Web 数据采集到系统监控告警——这篇万字长文将带你掌握 Python 自动化的全部核心技能,让重复性工作彻底告别你的日常。
目录
- 为什么 Python 是自动化的首选语言
- 文件系统操作:批量处理的艺术
- Web 自动化与数据采集
- 数据处理自动化:Pandas 实战
- 邮件、通知与报告自动发送
- 定时任务与工作流调度
- 系统监控与健康检查
- 综合实战:构建一个完整的文档自动处理流水线
- 常见问题与避坑指南
- 总结与下一步
一、为什么 Python 是自动化的首选语言
如果你曾经花一下午手工重命名 500 个文件,或者在 Excel 里反复复制粘贴做报表,你一定理解那种想砸键盘的冲动。自动化的核心动机很简单:把重复的事交给机器,把创造的事留给自己。
Python 的自动化优势
| 特性 | Python | Shell/Bash | Node.js | 说明 |
|---|---|---|---|---|
| 跨平台 | ✅ 完美 | ❌ Windows 不兼容 | ✅ | Python 写一次到处跑 |
| 标准库 | ✅ 极其丰富 | ✅ | ⚠️ 需 npm | os/pathlib/shutil 开箱即用 |
| 第三方生态 | ✅ requests/pandas/selenium | ❌ 依赖外部命令 | ✅ | 应有尽有 |
| 可读性 | ✅ 近乎自然语言 | ⚠️ 语法隐晦 | ✅ | 便于团队维护 |
| 性能 | ⚠️ 解释型 | ✅ 原生快 | ✅ V8 引擎 | 自动化场景 IO 密集,性能不敏感 |
| 学习曲线 | ✅ 平缓 | ⚠️ 陡峭 | ✅ | 适合非专业开发者 |
结论:Python 在自动化领域的统治地位不是偶然——它的标准库像瑞士军刀(万用但小巧),第三方生态像五金店(应有尽有),语法像写英语(谁都能看懂)。Windows/Mac/Linux 三端通吃,这意味着你写的脚本可以无缝移植。
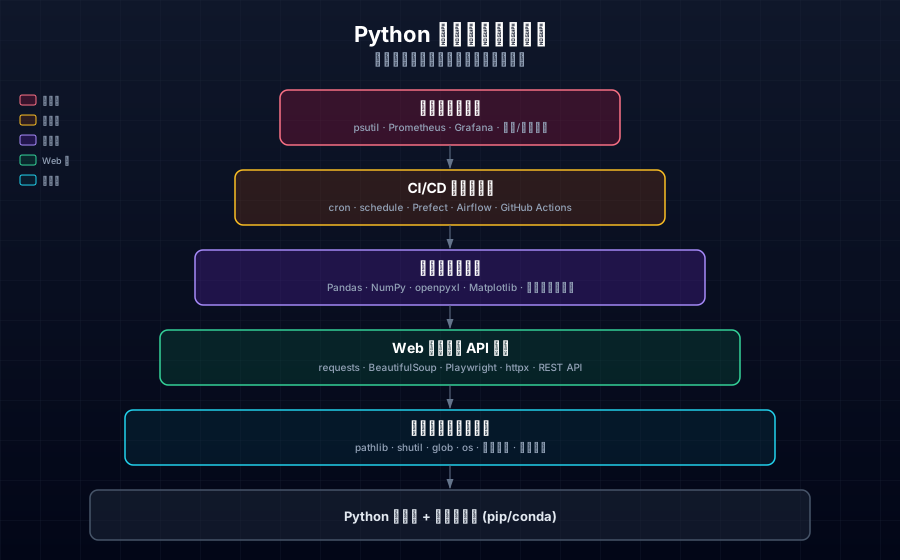
自动化技能金字塔
        ╱  系统级自动化 (CI/CD、监控、报警)  ╲
       ╱   数据流水线 (ETL、报表、数据清洗)   ╲
      ╱    定时任务与调度 (cron/调度器)       ╲
     ╱      Web 自动化 (爬虫/API/浏览器)       ╲
    ╱       文件操作自动化 (os/shutil/glob)     ╲
   ╱─────────────────────────────────────────────╲
从底层的文件操作到顶层的系统级自动化,每一层都是前一层能力的延伸。本文将从最基础的文件操作讲起,逐步带你攀登这座金字塔。
二、文件系统操作:批量处理的艺术
文件操作是自动化的"第一公里"——几乎所有脚本都从这里开始。Python 的 pathlib 模块(Python 3.4+)是处理文件的最佳实践,比传统的 os.path 更优雅。
2.1 为什么用 pathlib 替代 os.path
# ❌ 传统 os.path 风格——字符串拼接,可读性差
import os
path = os.path.join("data", "reports", "2026")
if not os.path.exists(path):
    os.makedirs(path)

# ✅ pathlib 风格——面向对象,链式调用,直观自然
from pathlib import Path
path = Path("data") / "reports" / "2026"
path.mkdir(parents=True, exist_ok=True)
pathlib 的核心优势:
- 面向对象:
Path("a") / "b"比os.path.join("a", "b")更直观 - 链式操作:
Path.home().glob("*.py")一气呵成 - 自动处理系统差异:Windows 反斜杠、Mac/Linux 正斜杠自动适配
- 自带模式匹配:
glob(),rglob()内置,无需额外导入glob模块
2.2 实战场景一:批量重命名文件
假设你从摄影展回来,发现相机生成的文件名全是 DSC_0001.JPG 这种毫无意义的数字,你需要把它们改成 2026-05-29_东京_001 这样的格式。
from pathlib import Path
from datetime import datetime
import re

def batch_rename(photo_dir: str, prefix: str = "photo"):
    """
    批量重命名指定目录下的所有图片文件。

    命名规则:{prefix}_{序号:03d}{后缀}
    例如:photo_001.jpg, photo_002.jpg
    """
    folder = Path(photo_dir)
    if not folder.exists():
        raise FileNotFoundError(f"目录不存在: {photo_dir}")

    # 支持的图片格式
    extensions = {".jpg", ".jpeg", ".png", ".gif", ".webp", ".bmp", ".tiff"}

    photos = sorted([
        f for f in folder.iterdir()
        if f.suffix.lower() in extensions and f.is_file()
    ])

    if not photos:
        print("⚠️ 未找到任何图片文件")
        return

    print(f"📸 找到 {len(photos)} 个图片文件,准备重命名...")

    renamed = 0
    for idx, photo in enumerate(photos, start=1):
        new_name = folder / f"{prefix}_{idx:03d}{photo.suffix.lower()}"
        # 如果新文件名已存在,跳过以避免覆盖
        if new_name.exists():
            print(f"⚠️ 跳过 (已存在): {new_name.name}")
            continue
        photo.rename(new_name)
        print(f"  ✅ {photo.name} → {new_name.name}")
        renamed += 1

    print(f"\n🎉 完成!成功重命名 {renamed}/{len(photos)} 个文件")

# 使用方法
# batch_rename("/Users/tom/Pictures/trip", prefix="tokyo_2026")
这个脚本展示了几个关键技巧:
iterdir()遍历目录但不递归,比os.listdir()更安全suffix.lower()大小写不敏感的扩展名匹配f"{idx:03d}"格式化补零,确保排序一致性- 防覆盖检查:
new_name.exists()避免意外覆盖
2.3 实战场景二:按文件类型分类整理
下载文件夹经常变成"垃圾场"——PDF、图片、安装包、文档混在一起。以下脚本帮你一键整理:
from pathlib import Path
import shutil

def organize_by_type(directory: str, dry_run: bool = True):
    """
    按文件类型将文件分类到子文件夹。

    参数:
        directory: 要整理的目录
        dry_run: True 只预览不执行,False 实际移动
    """
    base = Path(directory)

    # 文件类型 → 目标子文件夹映射
    type_map = {
        "图片": {".jpg", ".jpeg", ".png", ".gif", ".webp", ".svg", ".bmp"},
        "文档": {".pdf", ".docx", ".xlsx", ".pptx", ".txt", ".md", ".csv"},
        "压缩包": {".zip", ".rar", ".7z", ".tar", ".gz", ".bz2"},
        "安装程序": {".dmg", ".exe", ".msi", ".pkg", ".deb", ".rpm"},
        "视频": {".mp4", ".mov", ".avi", ".mkv", ".flv"},
        "音频": {".mp3", ".wav", ".flac", ".aac", ".ogg"},
        "代码": {".py", ".js", ".ts", ".rs", ".go", ".java", ".c", ".cpp", ".h"},
    }

    total = 0
    for category, extensions in type_map.items():
        # 创建目标文件夹
        target_dir = base / category
        if not dry_run:
            target_dir.mkdir(exist_ok=True)

        # 移动匹配的文件
        for ext in extensions:
            for file in base.glob(f"*{ext}"):
                dest = target_dir / file.name
                if not dry_run:
                    # shutil.move 会覆盖同名文件,先做检查
                    if dest.exists():
                        print(f"⚠️ 冲突: {file.name} 已存在于 {category}/")
                        continue
                    shutil.move(str(file), str(dest))
                print(f"  {'[预览]' if dry_run else '📦'} {file.name} → {category}/")
                total += 1

    print(f"\n{'🔍 预览完成' if dry_run else '✅ 整理完成'} — 共处理 {total} 个文件")

# 先预览
# organize_by_type("/Users/tom/Downloads", dry_run=True)
# 确认无误后执行
# organize_by_type("/Users/tom/Downloads", dry_run=False)
关键设计决策:
dry_run模式:先预览再执行,防止误操作——这条原则适用于所有自动化脚本shutil.move而非rename:move可以跨设备,而rename只能同分区- 冲突处理:同名文件不覆盖,保留原文件,提示用户手动处理
2.4 实战场景三:查找并清理大文件
磁盘空间告急?自动找出所有超过 100MB 的文件:
from pathlib import Path

def find_large_files(root: str, min_size_mb: int = 100, top_n: int = 20):
    """
    递归查找指定目录下的所有大文件。

    返回前 top_n 个最大的文件,按大小降序排列。
    """
    base = Path(root)
    if not base.exists():
        print(f"❌ 目录不存在: {root}")
        return

    files_with_size = []

    # rglob("**/*") 递归遍历所有子目录
    for entry in base.rglob("*"):
        if entry.is_file():
            size_mb = entry.stat().st_size / (1024 * 1024)  # 字节转 MB
            if size_mb >= min_size_mb:
                files_with_size.append((entry, size_mb))

    # 按大小降序排列
    files_with_size.sort(key=lambda x: x[1], reverse=True)

    print(f"🔍 在 {base} 中找到 {len(files_with_size)} 个 ≥ {min_size_mb}MB 的文件\n")
    total_wasted = 0
    for i, (path, size) in enumerate(files_with_size[:top_n], 1):
        print(f"  {i:2d}. {size:8.1f} MB  {path.relative_to(base.parent)}")
        total_wasted += size

    if len(files_with_size) > top_n:
        print(f"  ... 还有 {len(files_with_size) - top_n} 个文件未列出")

    print(f"\n💾 前 {min(top_n, len(files_with_size))} 个文件共占用 {total_wasted:.1f} MB")
    return files_with_size

# find_large_files("/Users/tom", min_size_mb=50)
性能提示:rglob("*") 会遍历所有子目录,在超大文件系统中可能较慢。如果只关心特定类型,可以指定模式如 rglob("*.log") 或 rglob("*.mp4")。
三、Web 自动化与数据采集
文件操作是入门的台阶,Web 自动化才是真正让你感受到"魔法"的领域。Python 的 requests + BeautifulSoup 组合堪称经典,而 Playwright 则是现代浏览器自动化的利器。
3.1 工具选型矩阵
| 工具 | 适用场景 | 速度 | JavaScript 支持 | 学习成本 |
|---|---|---|---|---|
requests + BeautifulSoup |
静态页面、REST API | ⚡ 极快 | ❌ | ⭐ 低 |
Scrapy |
大规模爬虫、数据采集 | ⚡ 快 | ❌ (需中间件) | ⭐⭐ 中 |
Playwright |
SPA、动态渲染、截图 | 🐢 慢 | ✅ 完整 | ⭐⭐ 中 |
Selenium |
传统浏览器自动化 | 🐢 慢 | ✅ 完整 | ⭐⭐⭐ 高 |
httpx |
异步 HTTP 客户端 | ⚡⚡ 极快 | ❌ | ⭐ 低 |
选型建议:90% 的自动化场景中,requests + BeautifulSoup 就足够了。只有当目标站点大量使用前端渲染时,才需要 Playwright。
3.2 实战:自动监控商品价格并发送通知
以下脚本定时检查某商品价格,一旦低于目标价就发送通知:
import requests
from bs4 import BeautifulSoup
import smtplib
from email.mime.text import MIMEText
from datetime import datetime
import json
import time

class PriceTracker:
    """商品价格监控器"""

    def __init__(self, config_file: str = "tracker_config.json"):
        self.config = self._load_config(config_file)
        self.session = requests.Session()
        # 模拟正常浏览器——大部分网站会拒绝无 User-Agent 的请求
        self.session.headers.update({
            "User-Agent": "Mozilla/5.0 (Macintosh; Intel Mac OS X 10_15_7) "
                          "AppleWebKit/537.36 (KHTML, like Gecko) "
                          "Chrome/131.0.0.0 Safari/537.36",
            "Accept-Language": "zh-CN,zh;q=0.9,en;q=0.8",
        })

    def _load_config(self, config_file):
        """加载监控配置"""
        default_config = {
            "interval_seconds": 3600,  # 每小时间隔
            "targets": [
                {
                    "name": "Python编程书",
                    "url": "https://example.com/book/python",
                    "css_selector": ".price-current",
                    "target_price": 49.00,
                    "notify": True,
                }
            ]
        }
        try:
            with open(config_file) as f:
                return json.load(f)
        except FileNotFoundError:
            return default_config

    def fetch_price(self, target):
        """获取单个商品价格"""
        try:
            resp = self.session.get(target["url"], timeout=10)
            resp.raise_for_status()

            soup = BeautifulSoup(resp.text, "html.parser")
            price_elem = soup.select_one(target["css_selector"])

            if not price_elem:
                print(f"⚠️ 未找到价格元素: {target['css_selector']}")
                return None

            # 提取数字(如 "¥49.00" → 49.0)
            import re
            match = re.search(r'[\d.]+', price_elem.text.strip())
            return float(match.group()) if match else None

        except requests.RequestException as e:
            print(f"❌ 请求失败 [{target['name']}]: {e}")
            return None

    def check_all(self):
        """检查所有监控目标"""
        alerts = []
        for target in self.config["targets"]:
            current_price = self.fetch_price(target)
            if current_price is None:
                continue

            print(f"📊 [{target['name']}] 当前价格: ¥{current_price}, "
                  f"目标价格: ¥{target['target_price']}")

            if current_price <= target["target_price"]:
                discount = (1 - current_price / target["target_price"]) * 100
                message = (f"🎉 降价提醒:{target['name']} 降至 ¥{current_price} "
                          f"(比目标价低 {discount:.0f}%)")
                alerts.append(message)
                print(f"  ✅ {message}")

        return alerts

    def run(self, once=False):
        """启动监控循环"""
        print(f"🚀 价格监控器启动 — {datetime.now().strftime('%Y-%m-%d %H:%M')}")

        while True:
            alerts = self.check_all()
            if alerts and any(t.get("notify", True) for t in self.config["targets"]):
                self._send_alert(alerts)

            if once:
                break

            interval = self.config["interval_seconds"]
            print(f"⏰ 下次检查: {interval} 秒后\n")
            time.sleep(interval)

    def _send_alert(self, messages):
        """发送告警通知(示例:打印)"""
        # 实际应用中可替换为邮件、企业微信、钉钉等
        print("\n" + "=" * 50)
        print("📢 价格告警")
        print("=" * 50)
        for msg in messages:
            print(f"  • {msg}")
        print("=" * 50 + "\n")


# tracker = PriceTracker("my_config.json")
# tracker.run(once=True)
这段代码展示了自动化脚本的几个重要模式:
- 配置外部化:JSON 文件控制行为,无需改代码
- Session 复用:
requests.Session()复用 TCP 连接,提升效率 - 异常处理:每个网络请求都包裹在 try/except 中
- 单一职责:
fetch_price只抓价格,check_all只做对比
3.3 实战:批量下载文件(带断点续传和进度条)
import requests
from pathlib import Path
from urllib.parse import urlparse

def download_file(url: str, dest_dir: str = "downloads",
                  chunk_size: int = 8192, resume: bool = True):
    """
    下载文件,支持断点续传和进度显示。

    参数:
        url: 文件下载链接
        dest_dir: 保存目录
        chunk_size: 每次读写的块大小(字节)
        resume: 是否启用断点续传
    返回:
        Path: 下载文件的本地路径
    """
    dest = Path(dest_dir)
    dest.mkdir(parents=True, exist_ok=True)

    # 从 URL 中提取文件名
    filename = urlparse(url).path.split("/")[-1] or "downloaded_file"
    filepath = dest / filename

    headers = {}
    downloaded = 0

    # 断点续传:如果文件已部分下载,从断点继续
    if resume and filepath.exists():
        downloaded = filepath.stat().st_size
        headers["Range"] = f"bytes={downloaded}-"
        print(f"📂 检测到已下载 {downloaded:,} 字节,从断点继续...")

    with requests.get(url, headers=headers, stream=True, timeout=60) as resp:
        total_size = int(resp.headers.get("content-length", 0))

        # 如果服务器支持断点续传且文件已完整,直接结束
        if resp.status_code == 416:  # Range Not Satisfiable
            print(f"✅ 文件已完整下载: {filepath.name}")
            return filepath

        resp.raise_for_status()

        # 打开文件(resume 模式追加写入,否则覆盖)
        mode = "ab" if resume and downloaded > 0 else "wb"

        with open(filepath, mode) as f:
            for chunk in resp.iter_content(chunk_size=chunk_size):
                if chunk:
                    f.write(chunk)
                    downloaded += len(chunk)

                    # 简易进度条
                    if total_size > 0:
                        pct = downloaded / total_size * 100
                        bar_len = 30
                        filled = int(bar_len * pct / 100)
                        bar = "█" * filled + "░" * (bar_len - filled)
                        print(f"\r  [{bar}] {pct:.1f}%  "
                              f"{downloaded:,}/{total_size:,} bytes", end="")

    print(f"\n✅ 下载完成: {filepath.name} "
          f"({downloaded:,} bytes)")
    return filepath

# download_file("https://example.com/large_dataset.zip")
注意:iter_content(chunk_size) 是关键——它将响应内容分块读取,避免大文件一次性加载到内存中(后者可能导致你的 Python 进程吃掉几个 GB 的内存)。
四、数据处理自动化:Pandas 实战
如果说文件操作和 Web 采集是自动化的"感知层",那么数据处理就是"决策层"。Pandas 是 Python 数据处理的核武器,掌握它意味着你可以在几分钟内完成原本需要一整天的手工 Excel 操作。
4.1 报表自动生成:从多源数据到一份统计报告
假设你每天上班第一件事是从三个 CSV 文件(销售、客户、库存)汇总出当天的经营报表。以下脚本帮你把这件事变成零秒完成:
import pandas as pd
from datetime import datetime, timedelta

def generate_daily_report(
    sales_csv: str,
    customers_csv: str,
    inventory_csv: str,
    output_path: str = None
):
    """
    从三个数据源生成每日经营报表。

    输出包含:
    1. 销售汇总(按产品/区域)
    2. 客户新增趋势
    3. 库存预警清单
    """
    # 加载数据
    sales = pd.read_csv(sales_csv, parse_dates=["date"])
    customers = pd.read_csv(customers_csv, parse_dates=["signup_date"])
    inventory = pd.read_csv(inventory_csv)

    today = pd.Timestamp.now().normalize()

    # ===== 1. 销售汇总 =====
    sales_today = sales[sales["date"] >= today]
    sales_by_product = (
        sales_today.groupby("product")
        .agg(销量=("quantity", "sum"), 营收=("revenue", "sum"))
        .sort_values("营收", ascending=False)
    )

    # Top 5 产品
    print("=" * 60)
    print("📊 今日销售 TOP 5 产品")
    print("=" * 60)
    print(sales_by_product.head(5).to_string())

    # 2. 客户分析
    new_customers_today = customers[customers["signup_date"] >= today]

    # 过去 7 天每天的注册数
    week_ago = today - timedelta(days=6)
    recent_customers = customers[customers["signup_date"] >= week_ago]
    daily_signups = (
        recent_customers.groupby(recent_customers["signup_date"].dt.date)
        .size()
        .reset_index(name="count")
    )

    print(f"\n📈 今日新增客户: {len(new_customers_today)} 人")
    print(f"📈 本周日均注册: {daily_signups['count'].mean():.1f} 人")

    # 3. 库存预警
    low_stock = inventory[inventory["quantity"] < inventory["min_threshold"]]
    if len(low_stock) > 0:
        print(f"\n⚠️ 库存预警 ({len(low_stock)} 项)")
        print(low_stock[["product", "quantity", "min_threshold"]].to_string())
    else:
        print("\n✅ 所有产品库存正常")

    # 4. 导出完整报表到 Excel
    if output_path is None:
        output_path = f"daily_report_{today.date()}.xlsx"

    with pd.ExcelWriter(output_path, engine="openpyxl") as writer:
        sales_by_product.to_excel(writer, sheet_name="销售汇总")
        daily_signups.to_excel(writer, sheet_name="客户趋势", index=False)
        low_stock.to_excel(writer, sheet_name="库存预警", index=False)

        # 添加一个数值汇总页
        summary = pd.DataFrame({
            "指标": ["今日销售额", "今日订单数", "新增客户", "库存预警项"],
            "数值": [
                f"¥{sales_today['revenue'].sum():,.2f}",
                len(sales_today),
                len(new_customers_today),
                len(low_stock),
            ]
        })
        summary.to_excel(writer, sheet_name="汇总", index=False)

    print(f"\n📄 报表已导出: {output_path}")
    return output_path

# generate_daily_report("sales.csv", "customers.csv", "inventory.csv")
4.2 数据清洗自动化:处理脏数据的标准流程
真实世界的数据永远是脏的——缺失值、重复行、格式不一致、异常值……以下是一个标准的数据清洗流水线:
import pandas as pd
import numpy as np
from typing import Optional

class DataCleaner:
    """
    通用数据清洗器,支持链式调用。

    使用示例:
        cleaner = DataCleaner(df)
        clean_df = (cleaner
            .drop_duplicates()
            .fill_missing(strategy="median")
            .normalize_dates("created_at")
            .remove_outliers("price", method="iqr")
            .result
        )
    """

    def __init__(self, df: pd.DataFrame):
        self.df = df.copy()
        self._report = []

    def drop_duplicates(self, subset=None):
        """删除完全重复或指定列重复的行"""
        before = len(self.df)
        self.df = self.df.drop_duplicates(subset=subset, keep="first")
        after = len(self.df)
        self._report.append(f"删除重复行: {before - after} 行")
        return self

    def fill_missing(self, strategy="median", columns=None):
        """
        填充缺失值。

        策略:
        - median: 中位数填充(数值列)
        - mean: 均值填充
        - mode: 众数填充(分类列)
        - forward: 前向填充
        - zero: 零填充
        """
        columns = columns or self.df.columns

        for col in columns:
            if col not in self.df.columns:
                continue
            missing = self.df[col].isna().sum()
            if missing == 0:
                continue

            if strategy == "median" and pd.api.types.is_numeric_dtype(self.df[col]):
                self.df[col] = self.df[col].fillna(self.df[col].median())
            elif strategy == "mean" and pd.api.types.is_numeric_dtype(self.df[col]):
                self.df[col] = self.df[col].fillna(self.df[col].mean())
            elif strategy == "mode":
                self.df[col] = self.df[col].fillna(self.df[col].mode()[0])
            elif strategy == "forward":
                self.df[col] = self.df[col].ffill()
            elif strategy == "zero":
                self.df[col] = self.df[col].fillna(0)

            self._report.append(f"填充 {col} 列: {missing} 个缺失值 ({strategy})")

        return self

    def normalize_dates(self, column):
        """统一日期格式为 YYYY-MM-DD"""
        if column not in self.df.columns:
            return self

        before_nulls = self.df[column].isna().sum()
        self.df[column] = pd.to_datetime(self.df[column], errors="coerce")
        after_nulls = self.df[column].isna().sum()

        new_nulls = after_nulls - before_nulls
        if new_nulls > 0:
            self._report.append(f"日期解析失败: {new_nulls} 行 → 已置为 NaN")
        else:
            self._report.append(f"日期列 {column} 格式化完成")

        return self

    def remove_outliers(self, column, method="iqr", threshold=1.5):
        """
        移除异常值。

        方法:
        - iqr: 四分位距法(Q1 - threshold*IQR 到 Q3 + threshold*IQR)
        - zscore: Z-Score 法(|z| > 3 视为异常)
        """
        if column not in self.df.columns:
            return self

        before = len(self.df)

        if method == "iqr":
            Q1 = self.df[column].quantile(0.25)
            Q3 = self.df[column].quantile(0.75)
            IQR = Q3 - Q1
            lower = Q1 - threshold * IQR
            upper = Q3 + threshold * IQR
            self.df = self.df[
                (self.df[column] >= lower) & (self.df[column] <= upper)
            ]
        elif method == "zscore":
            from scipy import stats
            z_scores = np.abs(stats.zscore(self.df[column].dropna()))
            self.df = self.df[z_scores < 3]

        after = len(self.df)
        self._report.append(f"移除 {column} 异常值: {before - after} 行 ({method})")
        return self

    @property
    def report(self):
        """获取清洗报告"""
        return "\n".join(self._report)

    @property
    def result(self):
        """获取清洗后的 DataFrame"""
        return self.df
链式调用模式是 Python 自动化的精髓——每个方法返回 self,让代码读起来像一个流水线语句,清晰且易扩展。
五、邮件、通知与报告自动发送
当你的脚本完成了数据采集和分析,下一步就是把结果推送给你。自动化和手动工作的分野,往往就在"主动推送"这个环节。
5.1 实战:带附件的定时邮件报告
import smtplib
from email.mime.text import MIMEText
from email.mime.multipart import MIMEMultipart
from email.mime.base import MIMEBase
from email import encoders
from pathlib import Path
from datetime import datetime

class EmailReporter:
    """邮件报告发送器"""

    def __init__(self, smtp_server: str, smtp_port: int,
                 sender_email: str, sender_password: str):
        self.smtp_server = smtp_server
        self.smtp_port = smtp_port
        self.sender_email = sender_email
        self.sender_password = sender_password

    def send_report(self,
                    to_emails: list[str],
                    subject: str,
                    body_html: str,
                    attachments: list[str] = None,
                    cc_emails: list[str] = None):
        """
        发送带附件的 HTML 邮件报告。

        参数:
            to_emails: 收件人列表
            subject: 邮件主题
            body_html: HTML 格式的邮件正文
            attachments: 附件文件路径列表
            cc_emails: 抄送列表
        """
        msg = MIMEMultipart("alternative")
        msg["From"] = self.sender_email
        msg["To"] = ", ".join(to_emails)
        msg["Subject"] = subject
        msg["Date"] = datetime.now().strftime("%a, %d %b %Y %H:%M:%S +0800")

        if cc_emails:
            msg["Cc"] = ", ".join(cc_emails)
            to_emails = to_emails + cc_emails

        # 添加 HTML 正文
        msg.attach(MIMEText(body_html, "html", "utf-8"))

        # 添加附件
        if attachments:
            for filepath in attachments:
                path = Path(filepath)
                if not path.exists():
                    print(f"⚠️ 附件不存在: {filepath}")
                    continue

                with open(path, "rb") as f:
                    attachment = MIMEBase("application", "octet-stream")
                    attachment.set_payload(f.read())
                    encoders.encode_base64(attachment)
                    attachment.add_header(
                        "Content-Disposition",
                        f'attachment; filename="{path.name}"'
                    )
                    msg.attach(attachment)

        # 发送
        try:
            with smtplib.SMTP_SSL(self.smtp_server, self.smtp_port) as server:
                server.login(self.sender_email, self.sender_password)
                server.sendmail(self.sender_email, to_emails, msg.as_string())
            print(f"✅ 邮件已发送 → {', '.join(to_emails)}")
        except smtplib.SMTPException as e:
            print(f"❌ 邮件发送失败: {e}")


# HTML 报告模板
def build_html_report(title: str, metrics: dict, highlights: list) -> str:
    """构建美观的 HTML 报告"""
    metrics_html = ""
    for label, value in metrics.items():
        metrics_html += f"""
        <div style="flex:1; margin:10px; padding:15px;
                    background:#f8f9fa; border-radius:8px; text-align:center;">
            <div style="font-size:24px; font-weight:bold; color:#4f46e5;">{value}</div>
            <div style="color:#6b7280; margin-top:5px;">{label}</div>
        </div>
        """

    highlights_html = "".join(f"<li>{h}</li>" for h in highlights)

    return f"""
    <html>
    <body style="font-family: 'Segoe UI', Arial, sans-serif;
                 max-width: 700px; margin: 0 auto; padding: 20px;">
        <div style="background: linear-gradient(135deg, #667eea 0%, #764ba2 100%);
                    color: white; padding: 30px; border-radius: 12px; text-align: center;">
            <h1 style="margin:0;">{title}</h1>
            <p style="margin-top:10px; opacity:0.9;">
                {datetime.now().strftime('%Y年%m月%d日')} 自动生成
            </p>
        </div>

        <div style="display:flex; flex-wrap:wrap; margin: 20px 0;">
            {metrics_html}
        </div>

        <div style="background: #fef3c7; padding: 20px; border-radius: 8px;
                    border-left: 4px solid #f59e0b;">
            <h3>📌 今日要点</h3>
            <ul>{highlights_html}</ul>
        </div>

        <p style="color: #9ca3af; font-size: 12px; text-align: center; margin-top: 30px;">
            此邮件由 Python 自动化脚本自动发送 | Powered by MarkShareX AI
        </p>
    </body>
    </html>
    """
5.2 替代方案:企业微信机器人通知
对于内部协作场景,发送到企业微信群往往比邮件更即时:
import requests
import json

def send_wechat_robot(webhook_url: str, content: str, msg_type: str = "markdown"):
    """
    通过企业微信机器人 Webhook 发送消息。

    参数:
        webhook_url: 机器人 Webhook 地址
        content: 消息内容
        msg_type: 消息类型 (text/markdown)
    """
    payload = {
        "msgtype": msg_type,
        msg_type: {"content": content}
    }

    resp = requests.post(webhook_url, json=payload, timeout=10)
    result = resp.json()

    if result.get("errcode") == 0:
        print("✅ 企业微信消息已发送")
    else:
        print(f"❌ 发送失败: {result.get('errmsg', 'Unknown error')}")

    return result

# webhook_url = "https://qyapi.weixin.qq.com/cgi-bin/webhook/send?key=YOUR_KEY"
# send_wechat_robot(webhook_url, "📊 今日销售报表已生成,请查收邮件")
六、定时任务与工作流调度
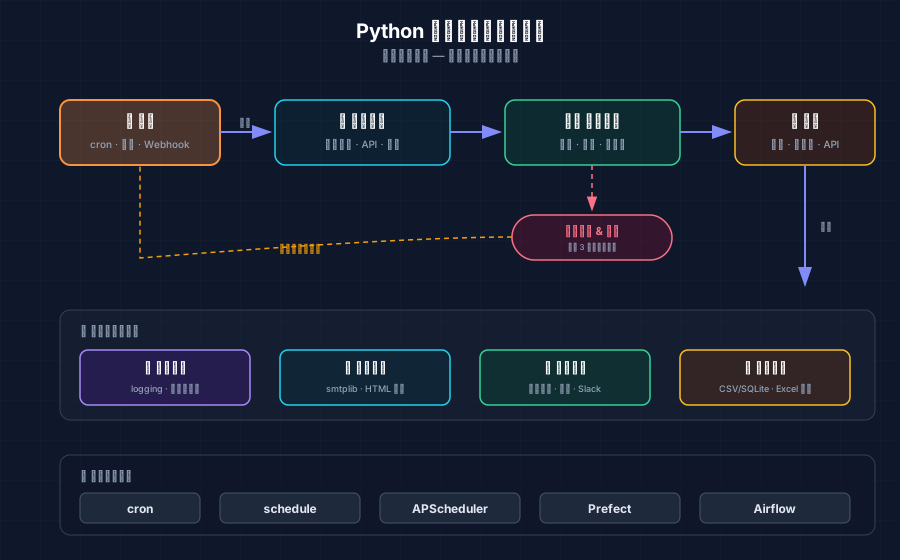
写出一个能自动执行的脚本只完成了一半工作,真正释放自动化威力的是"让它自己跑起来"。Python 提供了多层级的调度方案。
6.1 调度方案对比
| 方案 | 适用场景 | 配置方式 | 可视化 | 依赖管理 | 重试机制 |
|---|---|---|---|---|---|
cron |
简单定时 | crontab 语法 | ❌ | ❌ | ❌ |
APScheduler |
Python 内嵌 | Python API | ❌ | ⚠️ 需进程常驻 | ❌ |
schedule |
极简需求 | Python API | ❌ | ⚠️ 需进程常驻 | ❌ |
Prefect |
复杂数据管线 | Python 装饰器 | ✅ Web UI | ✅ | ✅ 自动 |
Airflow |
企业级 ETL | DAG Python | ✅ Web UI | ✅ | ✅ 自动 |
systemd timer |
Linux 系统级 | .timer 文件 | ❌ | ❌ | ❌ |
选型建议:
- 简单定时 →
cron(零依赖,系统原生) - Python 项目内调度 →
schedule库(3 行代码搞定) - 数据流水线 →
Prefect(比 Airflow 更轻量)
6.2 实战:使用 schedule 构建多任务调度器
import schedule
import time
from datetime import datetime
from functools import wraps

def log_execution(func):
    """装饰器:记录函数执行时间和状态"""
    @wraps(func)
    def wrapper(*args, **kwargs):
        name = func.__name__
        start = datetime.now()
        print(f"\n⏰ [{start.strftime('%H:%M:%S')}] 开始执行: {name}")
        try:
            result = func(*args, **kwargs)
            elapsed = (datetime.now() - start).total_seconds()
            print(f"✅ [{datetime.now().strftime('%H:%M:%S')}] "
                  f"{name} 完成 (耗时 {elapsed:.1f}s)")
            return result
        except Exception as e:
            elapsed = (datetime.now() - start).total_seconds()
            print(f"❌ [{datetime.now().strftime('%H:%M:%S')}] "
                  f"{name} 失败 ({elapsed:.1f}s): {e}")
            raise
    return wrapper


# === 定义任务 ===

@log_execution
def morning_report():
    """每天早上 9:00 生成并发送日报"""
    print("  📊 正在生成早间销售报表...")
    # 实际生产代码:
    # generate_daily_report("sales.csv", "customers.csv", "inventory.csv")
    time.sleep(1)  # 模拟执行时间
    print("  📧 已发送日报到管理层邮箱")

@log_execution
def clean_logs():
    """每天凌晨 2:00 清理过期日志"""
    print("  🧹 正在清理 30 天前的日志文件...")
    from pathlib import Path
    logs_dir = Path("logs")
    if logs_dir.exists():
        cutoff = time.time() - 30 * 24 * 3600
        deleted = 0
        for log_file in logs_dir.glob("*.log"):
            if log_file.stat().st_mtime < cutoff:
                log_file.unlink()
                deleted += 1
        print(f"  ✅ 已删除 {deleted} 个过期日志文件")

@log_execution
def health_check():
    """每小时执行一次系统健康检查"""
    import psutil
    print(f"  ❤️ CPU: {psutil.cpu_percent()}% | "
          f"内存: {psutil.virtual_memory().percent}% | "
          f"磁盘: {psutil.disk_usage('/').percent}%")


# === 配置调度 ===
schedule.every().day.at("09:00").do(morning_report)
schedule.every().day.at("02:00").do(clean_logs)
schedule.every(60).minutes.do(health_check)

# 开发环境可以更密集
# schedule.every(10).seconds.do(health_check)


print("🚀 任务调度器已启动")
print("=" * 50)
print("已注册任务:")
for job in schedule.jobs:
    print(f"  • {job.job_func.__name__}: {job}")
print("=" * 50)

# === 主循环 ===
try:
    while True:
        schedule.run_pending()
        time.sleep(1)
except KeyboardInterrupt:
    print("\n👋 调度器已停止")
关键设计模式:
@log_execution装饰器:统一记录所有任务的执行状态和耗时schedule.run_pending()+time.sleep(1):每秒检查一次,CPU 几乎零开销try/except在装饰器中:单个任务失败不影响其他任务调度
七、系统监控与健康检查
自动化不仅是为了省事,更是为了"省心"——让你在睡觉的时候,系统自己盯着自己。
7.1 完整的系统健康监控脚本
import psutil
import platform
import socket
from datetime import datetime
from pathlib import Path

class SystemHealthMonitor:
    """系统健康监控器"""

    def __init__(self, thresholds=None):
        self.thresholds = thresholds or {
            "cpu": 90,          # CPU 使用率告警阈值 (%)
            "memory": 90,       # 内存使用率告警阈值 (%)
            "disk": 85,         # 磁盘使用率告警阈值 (%)
            "disk_path": "/",   # 监控的磁盘路径
        }

    def get_system_info(self) -> dict:
        """收集系统基本信息"""
        return {
            "hostname": socket.gethostname(),
            "platform": platform.platform(),
            "python_version": platform.python_version(),
            "cpu_count": psutil.cpu_count(logical=False),  # 物理核心
            "cpu_count_logical": psutil.cpu_count(logical=True),  # 逻辑核心
            "boot_time": datetime.fromtimestamp(
                psutil.boot_time()
            ).strftime("%Y-%m-%d %H:%M"),
        }

    def check_all(self) -> dict:
        """
        执行全部健康检查,返回结果字典。

        返回值结构:
        {
            "timestamp": str,
            "status": "healthy" | "warning" | "critical",
            "checks": {
                "cpu": {"value": float, "status": str, "message": str},
                "memory": {...},
                "disk": {...},
                "network": {...},
                "processes": {...},
            },
            "warnings": [str],
            "criticals": [str],
        }
        """
        result = {
            "timestamp": datetime.now().isoformat(),
            "status": "healthy",
            "checks": {},
            "warnings": [],
            "criticals": [],
        }

        # CPU 检查
        cpu_pct = psutil.cpu_percent(interval=1)
        cpu_status = self._threshold_status(cpu_pct, self.thresholds["cpu"])
        result["checks"]["cpu"] = {
            "value": cpu_pct,
            "status": cpu_status,
            "message": f"CPU 使用率: {cpu_pct}%"
        }

        # 内存检查
        mem = psutil.virtual_memory()
        mem_pct = mem.percent
        mem_status = self._threshold_status(mem_pct, self.thresholds["memory"])
        result["checks"]["memory"] = {
            "value": mem_pct,
            "status": mem_status,
            "message": (f"内存: {mem_pct:.1f}% "
                       f"({mem.used / (1024**3):.1f}GB / "
                       f"{mem.total / (1024**3):.1f}GB)")
        }

        # 磁盘检查
        disk = psutil.disk_usage(self.thresholds["disk_path"])
        disk_pct = disk.percent
        disk_status = self._threshold_status(disk_pct, self.thresholds["disk"])
        result["checks"]["disk"] = {
            "value": disk_pct,
            "status": disk_status,
            "message": (f"磁盘 {self.thresholds['disk_path']}: "
                       f"{disk_pct:.1f}% "
                       f"({disk.free / (1024**3):.1f}GB 可用)")
        }

        # 网络检查
        net_io = psutil.net_io_counters()
        result["checks"]["network"] = {
            "value": 0,
            "status": "healthy",
            "message": (f"网络: ↑{net_io.bytes_sent / 1024**2:.0f}MB "
                       f"↓{net_io.bytes_recv / 1024**2:.0f}MB")
        }

        # 进程检查(TOP 5 CPU 消耗者)
        processes = []
        for proc in psutil.process_iter(["pid", "name", "cpu_percent"]):
            try:
                pinfo = proc.info
                if pinfo["cpu_percent"]:
                    processes.append(pinfo)
            except (psutil.NoSuchProcess, psutil.AccessDenied):
                pass

        processes.sort(key=lambda p: p["cpu_percent"], reverse=True)
        top5 = ", ".join(
            f"{p['name']}({p['cpu_percent']:.1f}%)"
            for p in processes[:5]
        )
        result["checks"]["processes"] = {
            "value": 0,
            "status": "healthy",
            "message": f"TOP 进程: {top5}" if top5 else "无活跃进程"
        }

        # 汇总告警
        for check in result["checks"].values():
            if check["status"] == "warning":
                result["warnings"].append(check["message"])
            elif check["status"] == "critical":
                result["criticals"].append(check["message"])

        if result["criticals"]:
            result["status"] = "critical"
        elif result["warnings"]:
            result["status"] = "warning"

        return result

    def _threshold_status(self, value: float, threshold: float) -> str:
        """根据阈值判断状态"""
        if value >= threshold:
            return "critical"
        elif value >= threshold * 0.8:
            return "warning"
        return "healthy"

    def print_report(self, result: dict):
        """格式化打印健康检查报告"""
        print("\n" + "=" * 60)
        print(f"🩺 系统健康检查 — {result['timestamp'][:19]}")
        print("=" * 60)

        icons = {"healthy": "✅", "warning": "⚠️", "critical": "🔴"}
        for name, check in result["checks"].items():
            icon = icons.get(check["status"], "❓")
            print(f"  {icon} {name}: {check['message']}")

        overall = icons.get(result["status"], "❓")
        print(f"\n  总体状态: {overall} {result['status'].upper()}")

        if result["warnings"]:
            print(f"\n⚠️ 警告 ({len(result['warnings'])}):")
            for w in result["warnings"]:
                print(f"  • {w}")
        if result["criticals"]:
            print(f"\n🔴 严重 ({len(result['criticals'])}):")
            for c in result["criticals"]:
                print(f"  • {c}")
        print("=" * 60 + "\n")


# monitor = SystemHealthMonitor()
# result = monitor.check_all()
# monitor.print_report(result)
八、综合实战:构建一个完整的文档自动处理流水线
理论够多了,现在把前面学到的所有技能串联起来,构建一个真实场景的端到端自动化项目。
8.1 需求定义
假设你的团队每天需要:
- 从邮件附件和共享文件夹收集当天的 Word 文档(
.docx) - 将这些文档转换为 Markdown 格式
- 统计字数、提取关键词
- 生成一份索引文件(汇总所有文档的元数据)
- 把处理结果打包,发送日报邮件
8.2 实现
#!/usr/bin/env python3
"""
文档自动处理流水线 — DocPipeline
====================================
每天从指定目录收集 .docx 文件 → 转换 Markdown → 统计分析 → 生成索引 → 邮件报告
"""

import re
from pathlib import Path
from datetime import datetime, timedelta
from collections import Counter
from docx import Document  # pip install python-docx
import markdown
import json

class DocPipeline:
    """文档处理流水线"""

    def __init__(self,
                 input_dir: str = "./incoming",
                 output_dir: str = "./processed",
                 index_file: str = "./index.json"):
        self.input_dir = Path(input_dir)
        self.output_dir = Path(output_dir)
        self.index_file = Path(index_file)

        # 确保输出目录存在
        self.output_dir.mkdir(parents=True, exist_ok=True)

    def collect_docs(self) -> list[Path]:
        """收集所有待处理的 .docx 文件"""
        docs = sorted(self.input_dir.glob("*.docx"))
        print(f"📂 发现 {len(docs)} 个待处理文档")
        for doc in docs:
            print(f"  • {doc.name}")
        return docs

    def docx_to_markdown(self, doc_path: Path) -> dict:
        """
        将单个 .docx 文件转换为 Markdown 并返回元数据。

        返回:
            {
                "filename": str,
                "title": str,
                "paragraphs": int,
                "characters": int,
                "headings": list,
                "keywords": list,
                "markdown_path": str,
            }
        """
        doc = Document(str(doc_path))

        # 提取所有段落文本
        all_paragraphs = []
        headings = []

        for para in doc.paragraphs:
            text = para.text.strip()
            if not text:
                continue

            # 识别标题(通过 Word 样式)
            if para.style.name.startswith("Heading"):
                level = int(para.style.name.split()[-1])
                all_paragraphs.append(f"{'#' * level} {text}")
                headings.append({"level": level, "text": text})
            else:
                all_paragraphs.append(text)

        full_text = "\n\n".join(all_paragraphs)

        # 统计
        char_count = len(full_text.replace("\n", "").replace(" ", ""))

        # 简单关键词提取(取出现最多的非停用词)
        words = re.findall(r'[\u4e00-\u9fff]+', full_text)  # 中文字符序列
        word_counts = Counter(words)
        # 过滤单字和常见停用词
        stop_words = {"我们", "他们", "可以", "需要", "使用", "一个", "这个", "这些",
                     "没有", "什么", "其中", "对于", "进行", "然后", "因为", "所以",
                     "如果", "所有", "来说", "并且", "因此", "但是", "它们", "不会",
                     "是否", "已经", "主要", "例如", "非常", "还是", "也是", "关于",
                     "这样", "目前", "自己", "相关", "不同", "问题", "通过", "通过",
                     "能够", "作为", "如何", "现在", "之后", "应该", "包括", "只有",
                     "方法", "一些", "不要", "不是", "情况", "第一", "其他", "介绍"}
        keywords = [w for w, c in word_counts.most_common(15)
                    if len(w) >= 2 and w not in stop_words][:8]

        # 标题:优先用第一个 heading,否则用文件名
        title = headings[0]["text"] if headings else doc_path.stem

        # 保存 Markdown
        md_filename = f"{doc_path.stem}.md"
        md_path = self.output_dir / md_filename
        md_path.write_text(full_text, encoding="utf-8")

        return {
            "filename": doc_path.name,
            "title": title,
            "paragraphs": len(all_paragraphs),
            "characters": char_count,
            "headings": headings,
            "keywords": keywords,
            "markdown_path": str(md_path),
        }

    def process_all(self) -> list[dict]:
        """处理所有文档,返回元数据列表"""
        docs = self.collect_docs()
        if not docs:
            print("⚠️ 没有找到可处理的文档")
            return []

        results = []
        for i, doc_path in enumerate(docs, 1):
            print(f"\n[{i}/{len(docs)}] 处理: {doc_path.name}")
            try:
                meta = self.docx_to_markdown(doc_path)
                results.append(meta)
                print(f"  ✅ 标题: {meta['title']}")
                print(f"  ✅ 字数: {meta['characters']:,} 字")
                print(f"  ✅ 段落: {meta['paragraphs']} 段")
                if meta['keywords']:
                    print(f"  🏷️ 关键词: {', '.join(meta['keywords'][:5])}")
            except Exception as e:
                print(f"  ❌ 处理失败: {e}")

        return results

    def generate_index(self, results: list[dict]) -> dict:
        """生成文档索引"""
        today = datetime.now().strftime("%Y-%m-%d")

        index = {
            "generated_at": datetime.now().isoformat(),
            "date": today,
            "total_docs": len(results),
            "total_characters": sum(r["characters"] for r in results),
            "documents": results,
            "aggregate_keywords": [],
        }

        # 聚合关键词
        all_keywords = []
        for r in results:
            all_keywords.extend(r["keywords"])
        index["aggregate_keywords"] = [
            kw for kw, c in Counter(all_keywords).most_common(10)
        ]

        # 保存索引
        self.index_file.write_text(
            json.dumps(index, ensure_ascii=False, indent=2),
            encoding="utf-8"
        )

        print(f"\n📑 索引文件已生成: {self.index_file}")
        print(f"   总文档数: {index['total_docs']}")
        print(f"   总字数: {index['total_characters']:,} 字")
        print(f"   热门关键词: {', '.join(index['aggregate_keywords'][:5])}")

        return index

    def run(self) -> dict:
        """执行完整流水线"""
        print("🚀 文档自动处理流水线启动")
        print("=" * 50)

        results = self.process_all()
        index = self.generate_index(results)

        print("\n" + "=" * 50)
        print("✅ 流水线执行完毕")

        return index


# if __name__ == "__main__":
#     pipeline = DocPipeline(
#         input_dir="./待处理文档",
#         output_dir="./已处理/2026-05-29"
#     )
#     pipeline.run()
这个端到端示例展示了自动化的完整闭环:
- 自动发现:
glob("*.docx")自动收集 - 逐个处理:异常隔离,一个文档失败不影响其他
- 统计分析:字数、关键词、段落数
- 结果输出:Markdown 转换 + JSON 索引
- 可追溯:每次运行都有完整的元数据记录
九、常见问题与避坑指南
Q1: 脚本在生产环境运行时突然崩溃,如何排查?
答:始终使用日志而非 print。将以下代码放在脚本开头:
import logging
logging.basicConfig(
    level=logging.INFO,
    format="%(asctime)s [%(levelname)s] %(message)s",
    handlers=[
        logging.FileHandler("automation.log", encoding="utf-8"),
        logging.StreamHandler()  # 同时输出到控制台
    ]
)
logger = logging.getLogger(__name__)

# 然后全部用 logger.info/error 替代 print
Q2: 文件路径在 Windows 和 Mac 上行为不一致怎么办?
答:永远使用 pathlib.Path,不要硬编码路径分隔符:
# ❌ 错误
path = "data\\reports\\2026"  # Windows 专属

# ✅ 正确
from pathlib import Path
path = Path("data") / "reports" / "2026"  # 跨平台自动适配
Q3: requests 请求被网站封禁怎么办?
答:三招组合拳:
- User-Agent 伪装:设置浏览器级别的 UA
- 请求间隔:
time.sleep(random.uniform(1, 3)) - Session 复用:保持 cookies
import time, random
import requests

session = requests.Session()
session.headers.update({
    "User-Agent": "Mozilla/5.0 ...",
    "Referer": "https://www.google.com/",
})

for url in urls:
    resp = session.get(url)
    # ... 处理数据 ...
    time.sleep(random.uniform(2, 5))  # 随机延迟
Q4: 如何让脚本在后台持续运行(守护进程化)?
答:三种方案:
- 开发测试:
nohup python script.py & - 生产环境:
systemdservice 文件 - 容器化:Docker +
docker run -d
Q5: 自动化脚本的执行结果如何通知我?
答:按严重性分级:
- 🟢 正常结果 → 每日汇总邮件
- 🟡 警告 → 企业微信/钉钉机器人
- 🔴 严重错误 → 短信/电话告警(如 Twilio)
Q6: 多个自动化任务之间有依赖关系怎么办?
答:引入工作流引擎:
# 简单场景:手动编排
def daily_workflow():
    data = collect_data()       # 步骤 1:采集
    cleaned = clean(data)       # 步骤 2:清洗(依赖步骤 1)
    report = analyze(cleaned)   # 步骤 3:分析(依赖步骤 2)
    send(report)                # 步骤 4:发送(依赖步骤 3)

# 复杂场景:使用 Prefect
from prefect import flow, task

@task
def collect_data():
    return ...

@task
def clean(data):
    return ...

@flow
def daily_workflow():
    data = collect_data()
    cleaned = clean(data)
    ...
Q7: Python 脚本运行太慢,如何优化?
答:自动化脚本的性能瓶颈通常在 IO:
# 1. 并发下载(asyncio + httpx)
import asyncio, httpx

async def fetch_all(urls):
    async with httpx.AsyncClient() as client:
        tasks = [client.get(url) for url in urls]
        return await asyncio.gather(*tasks)

# 2. 文件操作批量处理
from pathlib import Path
# 用 pathlib 代替 os 系列——它在底层做了优化

# 3. Pandas 使用向量化操作而非循环
# ❌ 慢:逐行遍历
for idx, row in df.iterrows():
    df.at[idx, "new_col"] = row["a"] + row["b"]

# ✅ 快:向量化
df["new_col"] = df["a"] + df["b"]
Q8: 如何保证脚本的幂等性(重复运行不产生副作用)?
答:每次运行前检查状态,确保相同输入产生相同输出:
def process_file(filepath):
    output_file = Path("processed") / f"{filepath.stem}_done{filepath.suffix}"

    # 幂等性检查:如果输出已存在,跳过
    if output_file.exists():
        print(f"⏭️ 跳过(已处理): {filepath.name}")
        return

    # ... 实际处理逻辑 ...
十、总结与下一步
回顾核心收获
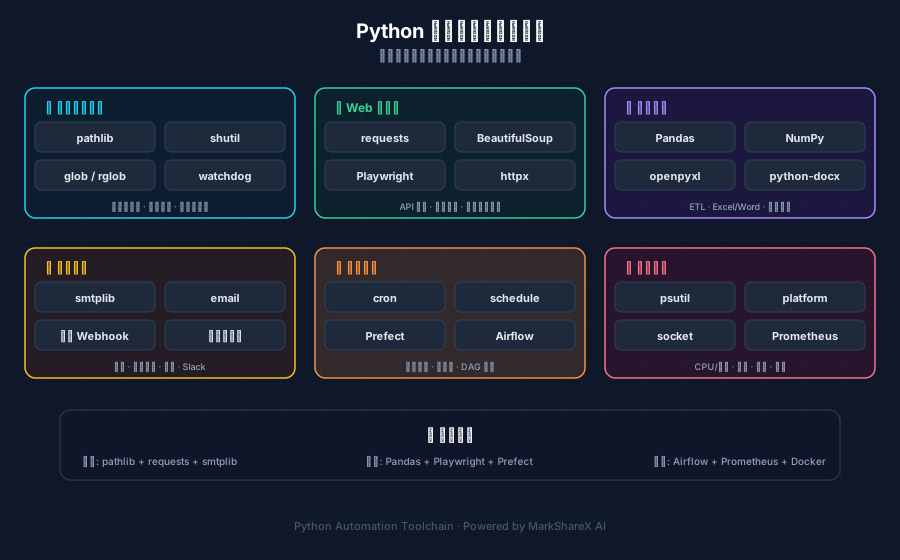
通过这篇指南,我们系统性地学习了 Python 自动化的六个核心领域:
| 领域 | 核心工具 | 关键概念 |
|---|---|---|
| 文件系统 | pathlib, shutil, glob |
面向对象路径,跨平台兼容 |
| Web 自动化 | requests, BeautifulSoup, Playwright |
Session 复用,异常处理 |
| 数据处理 | Pandas, openpyxl |
链式调用,向量化操作 |
| 消息推送 | smtplib, 企业微信/钉钉 Webhook |
分级告警,HTML 报告模板 |
| 定时调度 | schedule, cron |
装饰器日志,异常隔离 |
| 系统监控 | psutil |
阈值告警,健康检查模式 |
你的下一步行动
-
选一个痛点开始:从日常工作中挑一个最烦人的重复劳动,用一个脚本解决它——哪怕它只有 20 行。完成感是最好的学习驱动力。
-
逐步进阶:从文件操作开始 → Web 采集 → 数据处理 → 自动报告。每次只加一个新模块,不要试图一次掌握全部。
-
关注工程品质:当你写了 5 个以上脚本后,开始注意日志、配置外部化、错误处理——这些让脚本从"能用"升级到"可靠"。
-
探索工作流引擎:当你有了多个相互依赖的自动化任务时,
Prefect或Apache Airflow会让你的生活简单很多。 -
分享你的工具:把你写的实用脚本分享给同事——一个人的自动化是省时间,一个团队的自动化是省成本。
记住:自动化的终极目标不是让人失业,而是让人从重复性劳动中解放出来,去做更有创造性的事。 你花 2 小时写一个脚本,未来几年每天省 30 分钟——这笔投资的 ROI 高达 10,000%。
本文由 MarkShareX AI 自动创作,分类:Python,方向:自动化脚本